

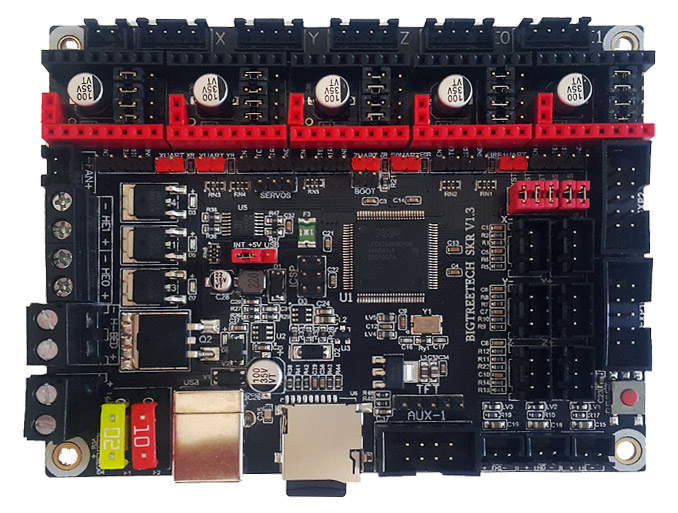
The SKR1.3 board is a cheap entry-level 32 bit board for 3d printing enthusiasts and has the added benefit of being able to run TMC drivers without additional wiring. For this project, I am using the TMC2209 Drivers and will be running the, in UART mode. I will not be using the sensorless homing feature, as at the time of writing this is a little buggy in Marlin 2.0.x
Things you will need:
- SKR1.3 board
- TMC2209 Drivers
- A copy of Marlin 2.0.x
optionally,
You will also want VSCODE and platformio installed.
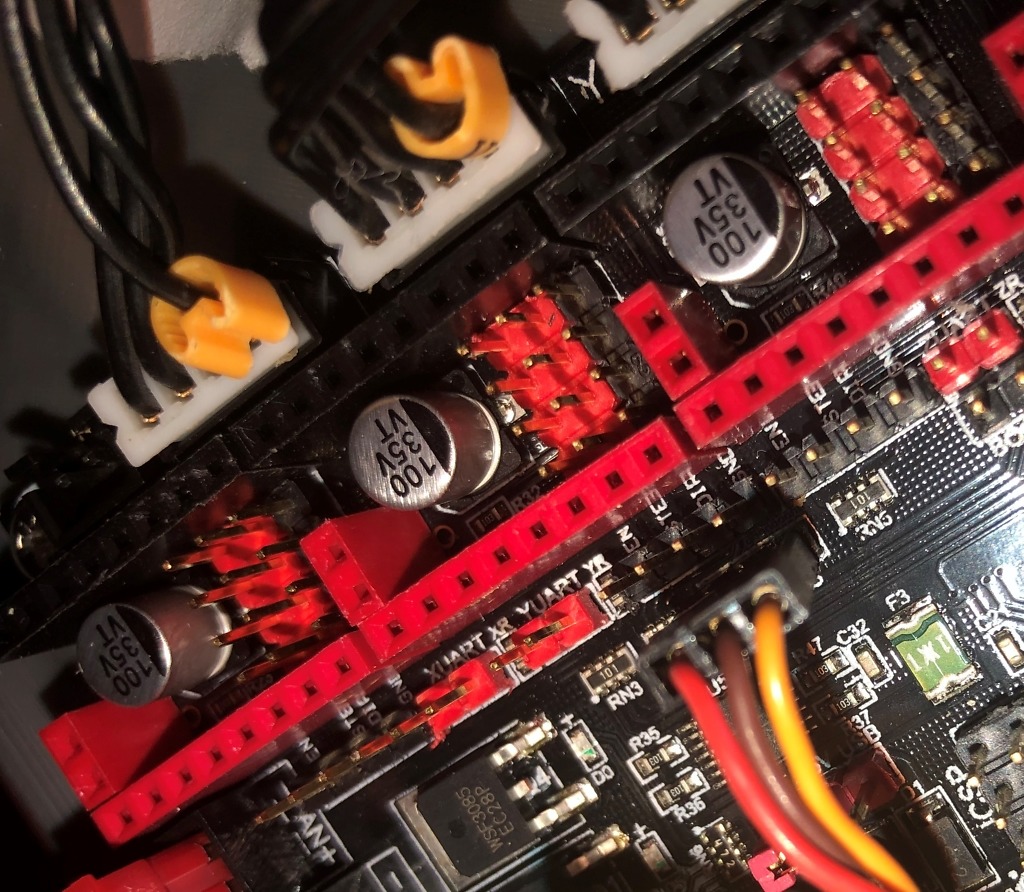
1. Jumper Settings
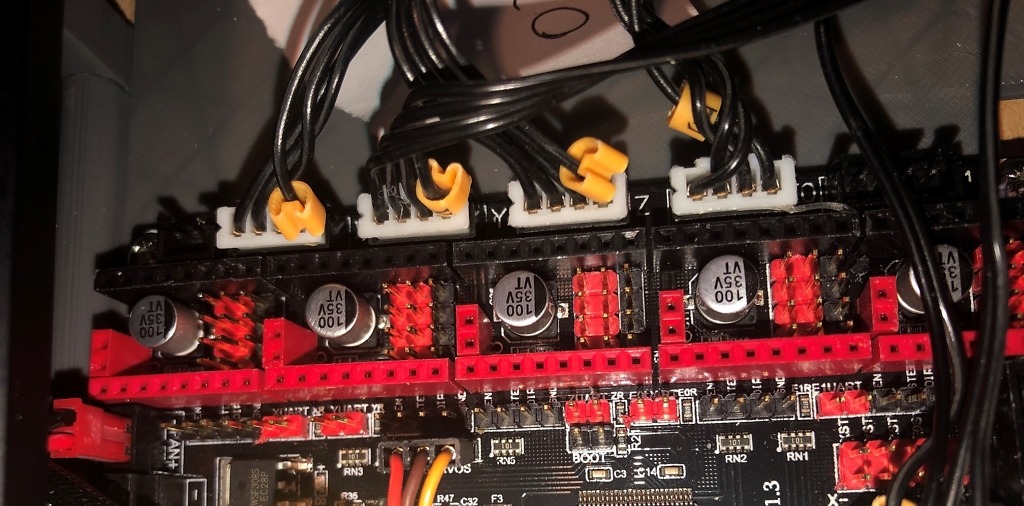
Remove all the jumpers as shown. If you are using the same drives I linked to, you will need to add a jumper for each axis as shown here (If you are using bigtreetech TMC2209 you can skip this)
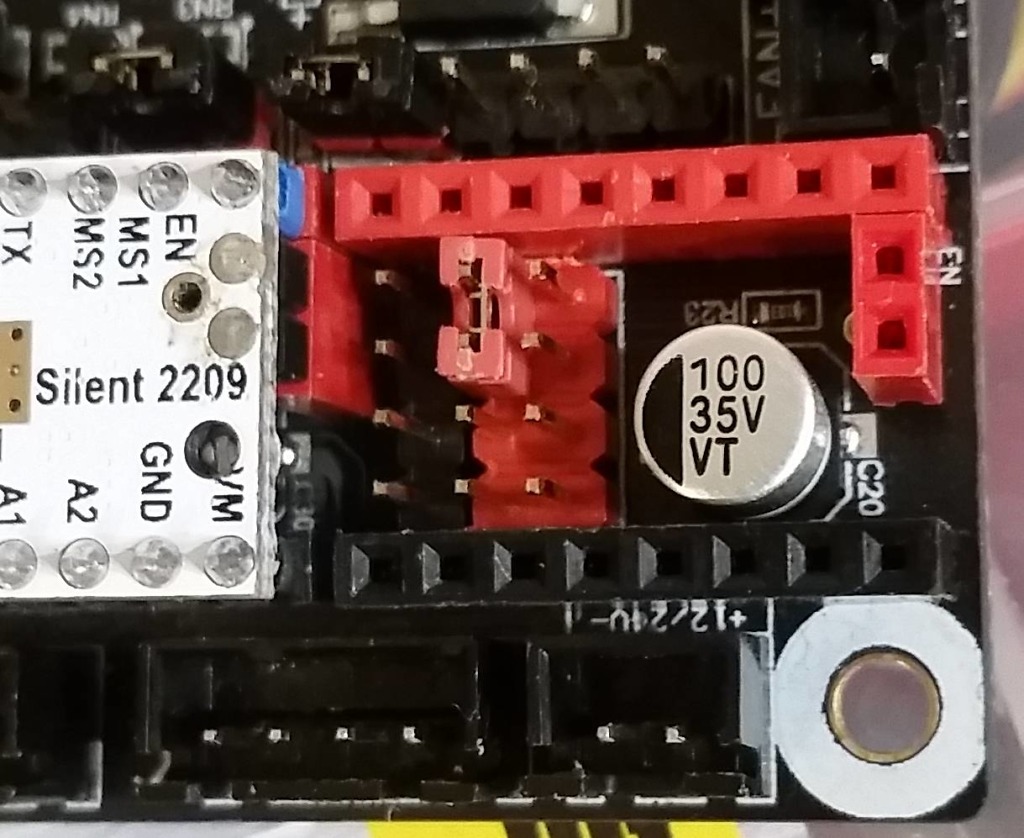
Next, to enable UART we need to add some more jumpers as shown here:
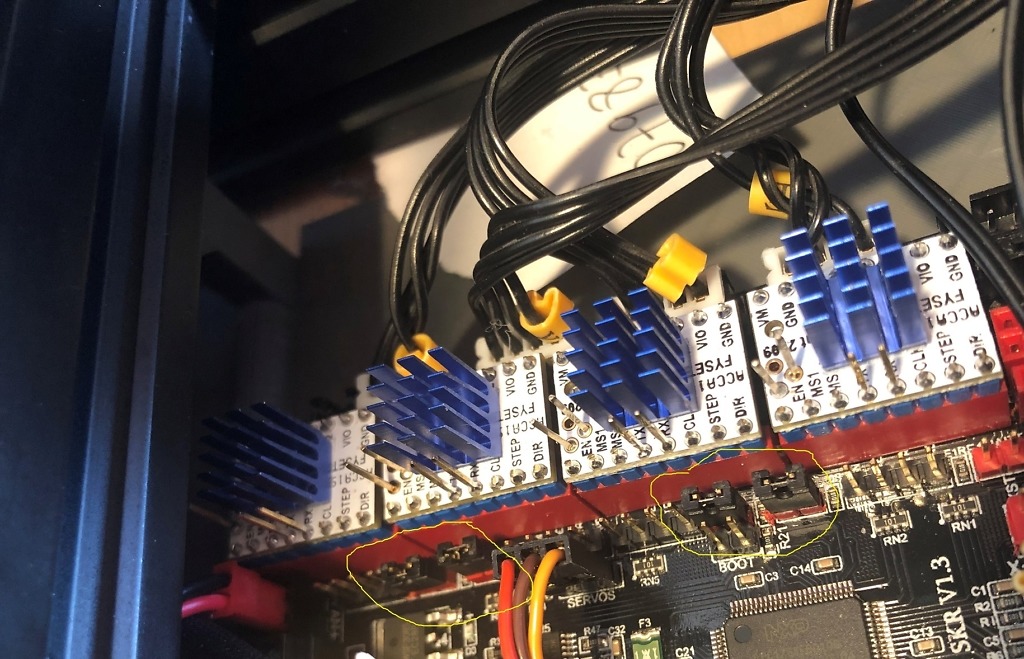
Make sure your drivers are inserted the correct way!
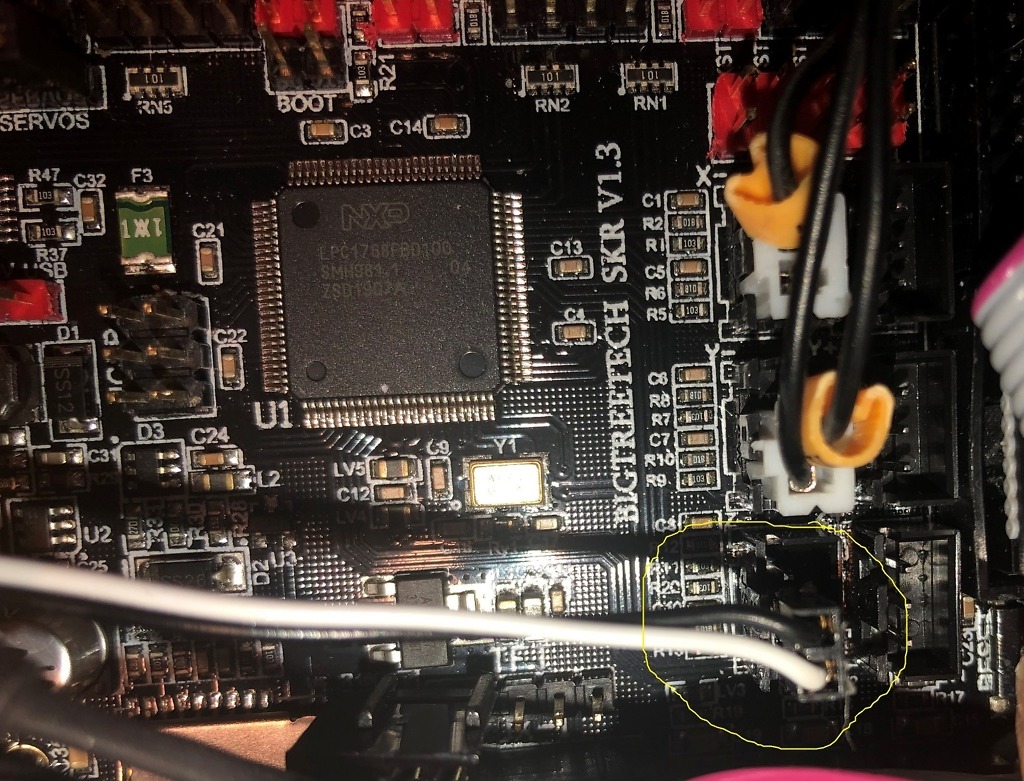
2. BLTOUCH
The BLtouch wiring is pretty straight forwards (Note, this is an original BLTOUCH, not a V3)
Pay attention to the order of the wires, you may need to swap yours around to match.
and plug the black and white wires into the Z endstop here as shown:
Ok, that’s it for wiring 🙂 now on to the Firmware.
3. Marlin
I am assuming you have downloaded VSCODE and installed platformio (see here if you haven’t).
You will need to change some options in platformio.ini:
change default_envs to LPC1768 (this is the processor in the SKR1.3)
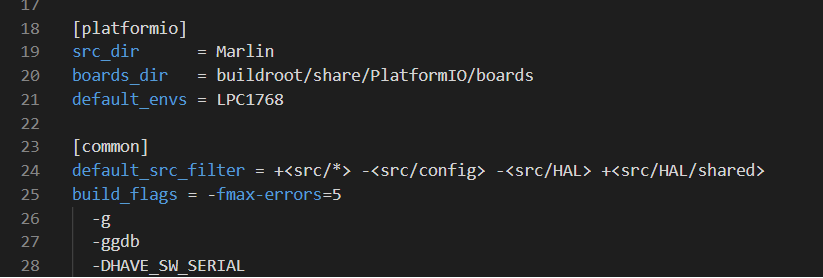
if you get TMC COMMUNICATION ERROR after uploading, you may also need to add -DHAVE_SW_SERIAL to the build flags as shown below:
[platformio]
src_dir      = Marlin
boards_dir   = buildroot/share/PlatformIO/boards
default_envs = LPC1768
default_src_filter = +<src/*> -<src/config> -<src/HAL> +<src/HAL/shared>
 build_flags = -fmax-errors=5
 -g
 -ggdb
 -DHAVE_SW_SERIAL
In configuration.h change these lines to match:
/**
 * Select the serial port on the board to use for communication with the host.
 * This allows the connection of wireless adapters (for instance) to non-default port pins.
 * Note: The first serial port (-1 or 0) will always be used by the Arduino bootloader.
 *
 * :[-1, 0, 1, 2, 3, 4, 5, 6, 7]
 */
#define SERIAL_PORT -1

/**
 * Select a secondary serial port on the board to use for communication with the host.
 * This allows the connection of wireless adapters (for instance) to non-default port pins.
 * Serial port -1 is the USB emulated serial port, if available.
 *
 * :[-1, 0, 1, 2, 3, 4, 5, 6, 7]
 */
#define SERIAL_PORT_2 0
Set the BAUD rate, Board and Machine name
#define BAUDRATE 115200

// Enable the Bluetooth serial interface on AT90USB devices
//#define BLUETOOTH

// Choose the name from boards.h that matches your setup
#ifndef MOTHERBOARD
  #define MOTHERBOARD BOARD_BIGTREE_SKR_V1_3
#endif

// Name displayed in the LCD "Ready" message and Info menu
#define CUSTOM_MACHINE_NAME "Ender 3 Pro"
Filament width
// Generally expected filament diameter (1.75, 2.85, 3.0, ...). Used for Volumetric, Filament Width Sensor, etc.
#define DEFAULT_NOMINAL_FILAMENT_DIA 1.75
If you are using a E3Dv6 hotend, change this line (Otherwise skip)
#define TEMP_SENSOR_0 5
Check these match:
// Mechanical endstop with COM to ground and NC to Signal uses "false" here (most common setup).
#define X_MIN_ENDSTOP_INVERTING false // Set to true to invert the logic of the endstop.
#define Y_MIN_ENDSTOP_INVERTING false // Set to true to invert the logic of the endstop.
#define Z_MIN_ENDSTOP_INVERTING false // Set to true to invert the logic of the endstop.
#define X_MAX_ENDSTOP_INVERTING false // Set to true to invert the logic of the endstop.
#define Y_MAX_ENDSTOP_INVERTING false // Set to true to invert the logic of the endstop.
#define Z_MAX_ENDSTOP_INVERTING false // Set to true to invert the logic of the endstop.
#define Z_MIN_PROBE_ENDSTOP_INVERTING true // Set to true to invert the logic of the probe.
Enter the correct stepper driver names:
#define X_DRIVER_TYPE  TMC2209
#define Y_DRIVER_TYPE  TMC2209
#define Z_DRIVER_TYPE  TMC2209
//#define X2_DRIVER_TYPE A4988
//#define Y2_DRIVER_TYPE A4988
//#define Z2_DRIVER_TYPE A4988
//#define Z3_DRIVER_TYPE A4988
#define E0_DRIVER_TYPE TMC2209
//#define E1_DRIVER_TYPE A4988
//#define E2_DRIVER_TYPE A4988
//#define E3_DRIVER_TYPE A4988
//#define E4_DRIVER_TYPE A4988
//#define E5_DRIVER_TYPE A4988
Check the default steps: (Yours may be different, the below are for a BMG clone extruder)
#define DEFAULT_AXIS_STEPS_PER_UNIT { 80, 80, 400, 423 }
Let’s turn on S-Curve acceleration for smoother moves:
#define S_CURVE_ACCELERATION
For BLTOUCH:
 * Z_MIN_PROBE_USES_Z_MIN_ENDSTOP_PIN
 *
 * Enable this option for a probe connected to the Z Min endstop pin.
 */
#define Z_MIN_PROBE_USES_Z_MIN_ENDSTOP_PIN
/**
* The BLTouch probe uses a Hall effect sensor and emulates a servo.
*/
#define BLTOUCH
Set probe offsets – yours will be different, don’t forget to measure!
/**
 * Z Probe to nozzle (X,Y) offset, relative to (0, 0).
 * X and Y offsets must be integers.
 *
 * In the following example the X and Y offsets are both positive:
 * #define X_PROBE_OFFSET_FROM_EXTRUDER 10
 * #define Y_PROBE_OFFSET_FROM_EXTRUDER 10
 *
 *     +-- BACK ---+
 *     |           |
 *   L |    (+) P  | R <-- probe (20,20)
 *   E |           | I
 *   F | (-) N (+) | G <-- nozzle (10,10)
 *   T |           | H
 *     |    (-)    | T
 *     |           |
 *     O-- FRONT --+
 *   (0,0)
 */
#define X_PROBE_OFFSET_FROM_EXTRUDER 44  // X offset: -left  +right  [of the nozzle]
#define Y_PROBE_OFFSET_FROM_EXTRUDER -10  // Y offset: -front +behind [the nozzle]
#define Z_PROBE_OFFSET_FROM_EXTRUDER 0   // Z offset: -below +above  [the nozzle]
Invert Axis (note, you should only need to invert the E0 if using direct drive
// Invert the stepper direction. Change (or reverse the motor connector) if an axis goes the wrong way.
#define INVERT_X_DIR true
#define INVERT_Y_DIR true
#define INVERT_Z_DIR false

// @section extruder

// For direct drive extruder v9 set to true, for geared extruder set to false.
#define INVERT_E0_DIR true
#define INVERT_E1_DIR false
#define INVERT_E2_DIR false
#define INVERT_E3_DIR false
#define INVERT_E4_DIR false
#define INVERT_E5_DIR false
Set bed size/limits (TIP my X_MIN and Y_MIN take in to account the set up of my bltouch, yours may be different, so start with zero and try from there)
// The size of the print bed
#define X_BED_SIZE 220
#define Y_BED_SIZE 220

// Travel limits (mm) after homing, corresponding to endstop positions.
#define X_MIN_POS -5
#define Y_MIN_POS -10
#define Z_MIN_POS 0
#define X_MAX_POS X_BED_SIZE
#define Y_MAX_POS Y_BED_SIZE
#define Z_MAX_POS 250
Uncomment the lines shown
#define AUTO_BED_LEVELING_BILINEAR
//#define AUTO_BED_LEVELING_UBL
//#define MESH_BED_LEVELING

/**
 * Normally G28 leaves leveling disabled on completion. Enable
 * this option to have G28 restore the prior leveling state.
 */
#define RESTORE_LEVELING_AFTER_G28
Turn on safe homing
#define Z_SAFE_HOMING
Turn on M500 command:
#defineEEPROM_SETTINGS
Enable the SD card
#define SDSUPPORT
Enable the stock display:
#define CR10_STOCKDISPLAY
Now we need to edit configuration_adv
#define E0_AUTO_FAN_PIN P2_04
I also like to turn this on so Octoprint can display progress on the LCD:
// Add an 'M73' G-code to set the current percentage
#define LCD_SET_PROGRESS_MANUALLY
Some additional settings around line 988
  // This allows hosts to request long names for files and folders with M33
  #define LONG_FILENAME_HOST_SUPPORT

  // Enable this option to scroll long filenames in the SD card menu
  #define SCROLL_LONG_FILENAMES
Check the SD card section
  #if HAS_SDCARD_CONNECTION
    /**
     * Set this option to one of the following (or the board's defaults apply):
     *
     *           LCD - Use the SD drive in the external LCD controller.
     *       ONBOARD - Use the SD drive on the control board. (No SD_DETECT_PIN. M21 to init.)
     *  CUSTOM_CABLE - Use a custom cable to access the SD (as defined in a pins file).
     *
     * :[ 'LCD', 'ONBOARD', 'CUSTOM_CABLE' ]
     */
    #define SDCARD_CONNECTION ONBOARD
  #endif
Set up babystepping
#define BABYSTEPPING
#if ENABLED(BABYSTEPPING)
  #define BABYSTEP_WITHOUT_HOMING
  //#define BABYSTEP_XY                     // Also enable X/Y Babystepping. Not supported on DELTA!
  #define BABYSTEP_INVERT_Z false           // Change if Z babysteps should go the other way
  #define BABYSTEP_MULTIPLICATOR  1         // Babysteps are very small. Increase for faster motion.

  //#define DOUBLECLICK_FOR_Z_BABYSTEPPING  // Double-click on the Status Screen for Z Babystepping.
  #if ENABLED(DOUBLECLICK_FOR_Z_BABYSTEPPING)
    #define DOUBLECLICK_MAX_INTERVAL 1250   // Maximum interval between clicks, in milliseconds.
                                            // Note: Extra time may be added to mitigate controller latency.
    #define BABYSTEP_ALWAYS_AVAILABLE     // Allow babystepping at all times (not just during movement).
    //#define MOVE_Z_WHEN_IDLE              // Jump to the move Z menu on doubleclick when printer is idle.
    #if ENABLED(MOVE_Z_WHEN_IDLE)
      #define MOVE_Z_IDLE_MULTIPLICATOR 1   // Multiply 1mm by this factor for the move step size.
    #endif
  #endif

  #define BABYSTEP_DISPLAY_TOTAL
We can now use bigger buffers to prevent stalling:
#if ENABLED(SDSUPPORT)
  #define BLOCK_BUFFER_SIZE 32 // SD,LCD,Buttons take more memory, block buffer needs to be smaller
#else
  #define BLOCK_BUFFER_SIZE 32 // maximize block buffer
#endif

// @section serial

// The ASCII buffer for serial input
#define MAX_CMD_SIZE 96
#define BUFSIZE 32

// Transmission to Host Buffer Size
// To save 386 bytes of PROGMEM (and TX_BUFFER_SIZE+3 bytes of RAM) set to 0.
// To buffer a simple "ok" you need 4 bytes.
// For ADVANCED_OK (M105) you need 32 bytes.
// For debug-echo: 128 bytes for the optimal speed.
// Other output doesn't need to be that speedy.
// :[0, 2, 4, 8, 16, 32, 64, 128, 256]
#define TX_BUFFER_SIZE 32

// Host Receive Buffer Size
// Without XON/XOFF flow control (see SERIAL_XON_XOFF below) 32 bytes should be enough.
// To use flow control, set this buffer size to at least 1024 bytes.
// :[0, 2, 4, 8, 16, 32, 64, 128, 256, 512, 1024, 2048]
//#define RX_BUFFER_SIZE 1024

#if RX_BUFFER_SIZE >= 1024
  // Enable to have the controller send XON/XOFF control characters to
  // the host to signal the RX buffer is becoming full.
  //#define SERIAL_XON_XOFF
#endif
Turn on the emergency parser
#define EMERGENCY_PARSER
Turn on filament change CHECK THE SETTINGS ARE RIGHT FOR YOU!
#define ADVANCED_PAUSE_FEATURE
#if ENABLED(ADVANCED_PAUSE_FEATURE)
  #define PAUSE_PARK_RETRACT_FEEDRATE         60  // (mm/s) Initial retract feedrate.
  #define PAUSE_PARK_RETRACT_LENGTH           0.5  // (mm) Initial retract.
                                                  // This short retract is done immediately, before parking the nozzle.
  #define FILAMENT_CHANGE_UNLOAD_FEEDRATE     10  // (mm/s) Unload filament feedrate. This can be pretty fast.
  #define FILAMENT_CHANGE_UNLOAD_ACCEL        25  // (mm/s^2) Lower acceleration may allow a faster feedrate.
  #define FILAMENT_CHANGE_UNLOAD_LENGTH      100  // (mm) The length of filament for a complete unload.
                                                  //   For Bowden, the full length of the tube and nozzle.
                                                  //   For direct drive, the full length of the nozzle.
                                                  //   Set to 0 for manual unloading.
  #define FILAMENT_CHANGE_SLOW_LOAD_FEEDRATE   6  // (mm/s) Slow move when starting load.
  #define FILAMENT_CHANGE_SLOW_LOAD_LENGTH     0  // (mm) Slow length, to allow time to insert material.
                                                  // 0 to disable start loading and skip to fast load only
  #define FILAMENT_CHANGE_FAST_LOAD_FEEDRATE   6  // (mm/s) Load filament feedrate. This can be pretty fast.
  #define FILAMENT_CHANGE_FAST_LOAD_ACCEL     25  // (mm/s^2) Lower acceleration may allow a faster feedrate.
  #define FILAMENT_CHANGE_FAST_LOAD_LENGTH     0  // (mm) Load length of filament, from extruder gear to nozzle.
                                                  //   For Bowden, the full length of the tube and nozzle.
                                                  //   For direct drive, the full length of the nozzle.
  //#define ADVANCED_PAUSE_CONTINUOUS_PURGE       // Purge continuously up to the purge length until interrupted.
  #define ADVANCED_PAUSE_PURGE_FEEDRATE        3  // (mm/s) Extrude feedrate (after loading). Should be slower than load feedrate.
  #define ADVANCED_PAUSE_PURGE_LENGTH         50  // (mm) Length to extrude after loading.
                                                  //   Set to 0 for manual extrusion.
                                                  //   Filament can be extruded repeatedly from the Filament Change menu
                                                  //   until extrusion is consistent, and to purge old filament.
  #define ADVANCED_PAUSE_RESUME_PRIME          0  // (mm) Extra distance to prime nozzle after returning from park.
  //#define ADVANCED_PAUSE_FANS_PAUSE             // Turn off print-cooling fans while the machine is paused.

                                                  // Filament Unload does a Retract, Delay, and Purge first:
  #define FILAMENT_UNLOAD_RETRACT_LENGTH      13  // (mm) Unload initial retract length.
  #define FILAMENT_UNLOAD_DELAY             5000  // (ms) Delay for the filament to cool after retract.
  #define FILAMENT_UNLOAD_PURGE_LENGTH         8  // (mm) An unretract is done, then this length is purged.

  #define PAUSE_PARK_NOZZLE_TIMEOUT           45  // (seconds) Time limit before the nozzle is turned off for safety.
  #define FILAMENT_CHANGE_ALERT_BEEPS         10  // Number of alert beeps to play when a response is needed.
  #define PAUSE_PARK_NO_STEPPER_TIMEOUT           // Enable for XYZ steppers to stay powered on during filament change.

  #define PARK_HEAD_ON_PAUSE                    // Park the nozzle during pause and filament change.
  //#define HOME_BEFORE_FILAMENT_CHANGE           // Ensure homing has been completed prior to parking for filament change

  #define FILAMENT_LOAD_UNLOAD_GCODES           // Add M701/M702 Load/Unload G-codes, plus Load/Unload in the LCD Prepare menu.
  //#define FILAMENT_UNLOAD_ALL_EXTRUDERS         // Allow M702 to unload all extruders above a minimum target temp (as set by M302)
#endif
Edit the settings for our drivers:
#if HAS_TRINAMIC

  #define HOLD_MULTIPLIER    0.5  // Scales down the holding current from run current
  #define INTERPOLATE       true  // Interpolate X/Y/Z_MICROSTEPS to 256

  #if AXIS_IS_TMC(X)
    #define X_CURRENT     600  // (mA) RMS current. Multiply by 1.414 for peak current.
    #define X_MICROSTEPS   16  // 0..256
    #define X_RSENSE     0.11
  #endif

  #if AXIS_IS_TMC(X2)
    #define X2_CURRENT    800
    #define X2_MICROSTEPS  16
    #define X2_RSENSE    0.11
  #endif

  #if AXIS_IS_TMC(Y)
    #define Y_CURRENT     600
    #define Y_MICROSTEPS   16
    #define Y_RSENSE     0.11
  #endif

  #if AXIS_IS_TMC(Y2)
    #define Y2_CURRENT    800
    #define Y2_MICROSTEPS  16
    #define Y2_RSENSE    0.11
  #endif

  #if AXIS_IS_TMC(Z)
    #define Z_CURRENT     600
    #define Z_MICROSTEPS   16
    #define Z_RSENSE     0.11
  #endif

  #if AXIS_IS_TMC(Z2)
    #define Z2_CURRENT    800
    #define Z2_MICROSTEPS  16
    #define Z2_RSENSE    0.11
  #endif

  #if AXIS_IS_TMC(Z3)
    #define Z3_CURRENT    800
    #define Z3_MICROSTEPS  16
    #define Z3_RSENSE    0.11
  #endif

  #if AXIS_IS_TMC(E0)
    #define E0_CURRENT    600
    #define E0_MICROSTEPS  16
    #define E0_RSENSE    0.11
  #endif

  #if AXIS_IS_TMC(E1)
    #define E1_CURRENT    800
    #define E1_MICROSTEPS  16
    #define E1_RSENSE    0.11
  #endif

  #if AXIS_IS_TMC(E2)
    #define E2_CURRENT    800
    #define E2_MICROSTEPS  16
    #define E2_RSENSE    0.11
  #endif

  #if AXIS_IS_TMC(E3)
    #define E3_CURRENT    800
    #define E3_MICROSTEPS  16
    #define E3_RSENSE    0.11
  #endif

  #if AXIS_IS_TMC(E4)
    #define E4_CURRENT    800
    #define E4_MICROSTEPS  16
    #define E4_RSENSE    0.11
  #endif

  #if AXIS_IS_TMC(E5)
    #define E5_CURRENT    800
    #define E5_MICROSTEPS  16
    #define E5_RSENSE    0.11
  #endif
Software driver enable:
  #define STEALTHCHOP_XY
  #define STEALTHCHOP_Z
  #define STEALTHCHOP_E
Make sure we have the correct voltage set!
#define CHOPPER_TIMING CHOPPER_DEFAULT_24V
Monitor the Driver Status
#define MONITOR_DRIVER_STATUS
Set the threshold values for hybrid mode:
#define HYBRID_THRESHOLD

  #define X_HYBRID_THRESHOLD     100  // [mm/s]
  #define X2_HYBRID_THRESHOLD    100
  #define Y_HYBRID_THRESHOLD     100
  #define Y2_HYBRID_THRESHOLD    100
  #define Z_HYBRID_THRESHOLD       3
  #define Z2_HYBRID_THRESHOLD      3
  #define Z3_HYBRID_THRESHOLD      3
  #define E0_HYBRID_THRESHOLD     30
  #define E1_HYBRID_THRESHOLD     30
  #define E2_HYBRID_THRESHOLD     30
  #define E3_HYBRID_THRESHOLD     30
  #define E4_HYBRID_THRESHOLD     30
  #define E5_HYBRID_THRESHOLD     30
Turn on Debug so we can use the M122 Command
#define TMC_DEBUG
Now press CTRL+ALT+B and check the terminal window, after a short while you should see:
Environment               Status    Duration
------------------------  --------  ------------
megaatmega2560            IGNORED
megaatmega1280            IGNORED
at90usb1286_cdc           IGNORED
at90usb1286_dfu           IGNORED
DUE                       IGNORED
DUE_USB                   IGNORED
DUE_debug                 IGNORED
LPC1768                   SUCCESS   00:01:06.729
LPC1769                   IGNORED
melzi                     IGNORED
melzi_optiboot            IGNORED
rambo                     IGNORED
sanguino_atmega644p       IGNORED
sanguino_atmega1284p      IGNORED
STM32F1                   IGNORED
fysetc_STM32F1            IGNORED
BIGTREE_SKR_MINI          IGNORED
STM32F4                   IGNORED
STM32F7                   IGNORED
ARMED                     IGNORED
alfawise_U20              IGNORED
mks_robin                 IGNORED
mks_robin_lite            IGNORED
mks_robin_mini            IGNORED
mks_robin_nano            IGNORED
jgaurora_a5s_a1           IGNORED
black_stm32f407ve         IGNORED
BIGTREE_SKR_PRO           IGNORED
BIGTREE_BTT002            IGNORED
teensy31                  IGNORED
teensy35                  IGNORED
malyanm200                IGNORED
esp32                     IGNORED
fysetc_f6_13              IGNORED
linux_native              IGNORED
adafruit_grandcentral_m4  IGNORED
===================================== 1 succeeded in 00:01:06.729 =====================================
If this has not been successful, check the set of VSCODE and make sure you have all the relevant libraries installed!

The firmware will be saved to PATHTOYOURMARLINFOLDER\.pio\build\LPC1768\firmware.bin
Copy the firmare.bin file to your sd card, put the card back in the board and cycle the power, this will cause the printer to flash the new firmware. Alternatively, you can use the firmware updater plugin in Octoprint to upload the file.
Thanks for the post it helped me a lot, question, how long does your build takes? Mines are going over 20 minutes!
Compiling in VSCODE takes around 5 minutes, but im running a Ryzen 7 8 core cpu with 32Gb of ram..
Over here I had a lot of warnings, one thing that I changed that reduced the build time by a lot was disable the format on save option in vscode, I think it was messing up with the indentation and comments.