

In my previous post, I wrote about upgrading the Ender 3 pro to a MKS GEN L board, and TMC2208 drivers configured in UART mode. Since then, I have had issues with instability in the hotend temperatures, leading to long waits before printing would start. After some research, I could see that many other users were experiencing the same issue, although some had rectified this by replacing the capacitor on the 5v rail to try and smooth the voltage out. The thermistor in the hot end uses the 5v rail for power, and it is this giving unstable temperature readings.
I decided to replace the board with an MKS GEN 1.4 as these are reportedly more stable. I also decided to ditch the UART mode, and run the drivers in ‘legacy’ mode to simplify the wiring.
Things you will need for this:
Some basic tools Wire cutters, small screwdrivers and a multimeter
Coffee & Patience!
Wiring
I also have a BLTOUCH, wired like so: (TIP – use a dab of hotglue to secure the black and white 2 pin connector in place, mine had a habit of working lose!)
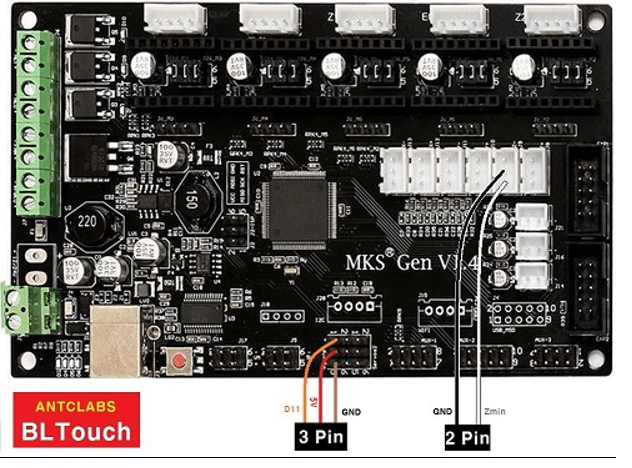
First, take note of the wires on the original Creality board (if you are using one) or the MKS GEN L if you are using that.
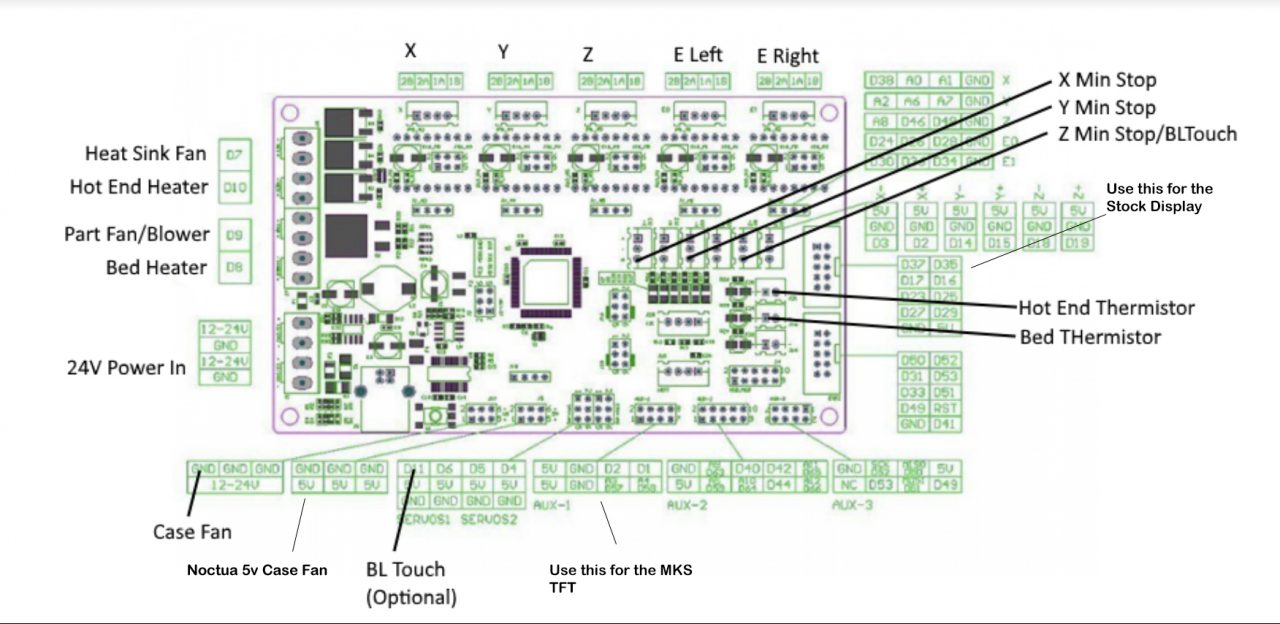
You will need to cut the plug off the end of the hot end fan (blue and yellow on mine) strip the wires and wire them to the ‘Heat Sink’ socket shown below, noting the polarity. Wire the remaining components EXCEPT for the stepper motors (we will do this after setting the VREFs on the drivers). Remove Jumper 3 from all the sockets where you will be using TMC2208s (the right hand one of the 3 if you have the board orientated as above)
Next, install the drivers, making sure to check the GND and DIR pins on the drivers match the ones on the board. Mine had the VREF adjustment on the left when inserted, yours may be different, so check!
Power up the board, and using a meter set to 2V measure the vref. On my drivers this is measured by putting the positive probe on the potentiometer and the black probe on the GND pin of the driver.
I ALWAYS measure, power off, adjust, power on and re-measure. Doing this prevents accidental shorts which may damage your board or drivers.
The following table shows the VREFs you need for each axis
| X | 0.725 |
| Y | 0.725 |
| Z | 0.725 |
| E | 0.900 |
Once you have done this, plug in the stepper motors, and power up.
Next we need to flash the correct firmware to the board.
You can download my pre-configured version here
This is set for using a BLTOUCH. If you are not using a BLTOUCH simply comment out line 734 in Configuration.h so it reads
//#define BLTOUCH
open the Marlin.ino in the Arduino IDE, make sure you have set the board to “Arduino/Genuino Mega or Mega 2560” and the programmer to “AVR ISP” and select the correct com port for your printer and hit the upload button and wait for it to compile and upload.
Once uploaded, still in Arduino, go to tools -> Serial monitor. Set the baud rate to 250000, and you should see a response from the printer. Enter “M502” in the terminal to load the new defaults, and “M500” to save these. If using a BLTOUCH you will need to recalibrate your Z offset.
Next, we need to run a PID autotune to get the correct settings for our hot end.
Enter “M303 E0 S220 C3” to begin the tuning process, this will take a few minutes, and at the end it will give you suggested values wor P,I and D
Put these into the following command
M301 Pxx.xx Ixx.xx Dxx.xx
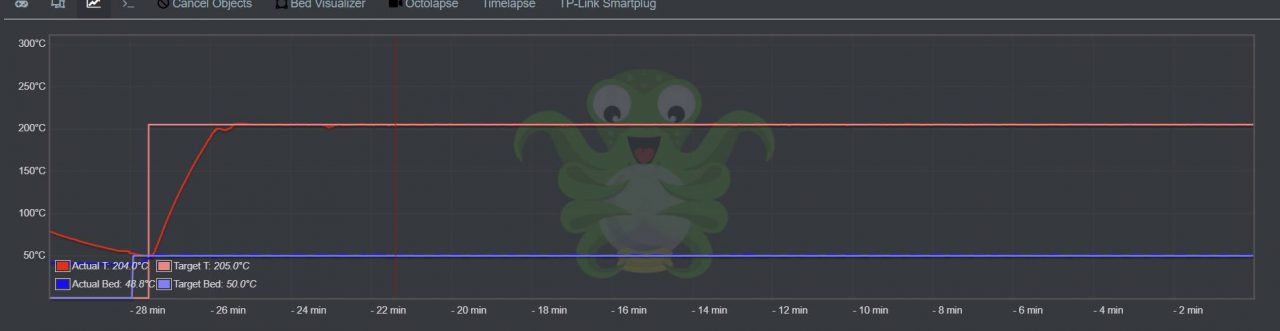
Store with “M500” then enter “M501” to make sure they are reloaded. Here is my graph after running a PID autotune, nice and stable!
That’s it! if you found this post useful, please consider donating or using the affiliate links in this post (It costs you no more, but helps me fund my web hosting, tools etc)
[Exq_ppd_form]
I downloaded your pre config firmware for my E3 only had to change my motor directions. So I’m getting horrible clicking on Zed and some on E. X and y seem ok. I have changed Vref values from .78v to 1.2v. I have active cooling on the steppers. But the clicking is so bad I cannot even get a print off. I don’t know what to do. I also used TH3D marlin base firmware. I even swapped the x and y 2208s for Z and E to rule out bad steppers. Same thing. No difference. The steppers are in the simple drop in mode. I’m at my limit. I don’t know what else to do. I have been on this for 5 days straight now. Please my company would not mind making a handsome donation to your site if you can help with a solution.
Sincerely,
Jeremy B
Hi Jeremy, let’s do some basic troubleshooting first.
First off in the configuration.h check all the axis are set to tmc2208_standalone and not just tmc2208.
Next try swapping the stepper cables on the board from a non working one to a working one, eg plug the z into the x and try moving it. Let me know how you get on. Maybe if you can put your configuration.h in pastebin I can take a look over it
@jeremy what board are you using?
Jimmy – Great site – I’ve been ALL over the web trying to get my similar config to work.
Im using MKS Gen 14 board with 2208’s – prints slient and well BUT
the hotend temperature holds at 210 per Cura when printing via USB for about 5 minutes into the print, then for some reason jumps up to 240 and the PLA print fails.
Ideas?
First thing I would do is load up the gcode generated by cura and make sure it’s not changing temp anywhere accept the beginning
how do i upload the gcode?
you mean read with a text editor? it DOES seem to happen at the same place
I’m looking at the gcode although I need to know what to look for as far as the temp spike goes. Also I didn’t CUT the blue/yellow wires from the Ender – I just stuck the two pins on the MKS per your diagram. i may have them backwards
M104 in gcode sets the hot end temp, have a look
In notepad and see if it is setting it elsewhere.
you are a rock star Jimmy.. For some reason Cura is setting m104 to 240 at layer 1.
Can i simply delete this line in the gcode and I’ve been printing with Cura for a long time and never seen this. ideas>
I’m not near a computer right now, but if you have been pasting in custom gcode anywhere something may have got left over (maybe something you did for a temp tower?)
You can just delete that line for now and should be good to go
https://ultimaker.com/en/resources/20442-post-processing-plugins
Jimmy – I’m all good on the 240 temp change. Now the only remaining issue I have is the SD card reader on the RepRap discount full graphuc smart controller. 3 different SD cards no read. it detects insert and remove. I will gladly donate to you if you can help fix this
In configuration.h (approx lines 1213-1219) you need to uncomment
//#define SDSUPPORT
Already done the SDSupport uncomment. I can’t get the 2.0 marlin firmware to compile.
what are you using to compile Marlin 2.0?
Hi, i have a problem . ENDER3 + MKS GEN V1.4 + Bltouch + TMC2208 + E3DV6 + TFT32
I connected everything, I adjusted my drivers. I struggled but managed to transfer the firmware. I try to make a Home with my screen but everything goes in all directions. I don’t understand I did everything as you indicated. The engines make a lot of noise.
Check you have the jumpers correct under the drives – depending on the drivers you may need to invert the direction in Marlin. When testing new firmware, don’t ‘Home’ = use pronterface or octoprint to move the axis and make sure they move in the correct direction and the correct distance
I’tswill it be possible with this card to put marlin 2.x.x? Thank you
Hi Jimmy. I want to thank you for your post, it’s bene great help to get my Ender 3 Pro upgraded with MKS gen 1.4 and 2208 drivers. I’m however not completely done.
I used the software supplied here https://www.danbp.org/p/en/node/146 since it looked like you only had 1.1.7 and perhaps less features?
Anyway, I’ve got it to work and I can control my machine from USB. The problem is that my LCD is not working. It’s simply dark.
I’ve read suggestions on turning the ribbon cable 180 degrees, but I’ve also read that I would need a second cable.
Some pages also say I should connect to EXP1 and EXP2 on the LCD board rather than EXP3. But I’m hesitant to change too much before I’m sure.
Right now it’s connected to EXP3 (as it was with the original main board) and connected to the MKS gen 1.4 as per your instructions.
I’ve updated the LCD section in configuration.h to have both
#define REPRAP_DISCOUNT_FULL_GRAPHIC_SMART_CONTROLLER
#define CR10_STOCKDISPLAY
just like your file.
Any help is appreciated!